Hooking with Binary Ninja
Over my winter break I read "Grey Hat Python" to refresh my python skills and hopefully learn some new tricks and tools. While the book is dated and some of the tools demonstrated are no longer maintained, I still learned plenty. One of the reverse engineering techniques touched on in the book is "hooking." Hooking is essentially inserting custom code to be run whenever an important piece of the original binary is executed. One use for this is logging arguments passed to functions that you're analyzing. Based on the arguments and how often the function is called, you may be able to glean more information about what the function is used for. In the book, it is suggested to add hooks dynamically at run-time using a debugger, but I felt this step unnecessary. Why can't I insert a hook directly into an executable? I decided to see if I could using Binary Ninja.
Binary Ninja, developed by Vector35, is the new kid on the block when it comes to interactive disassemblers. I bought a student edition a while back because it's pleasant to use and I like the idea of IDA Pro having a legitimate competitor. It doesn't have the crazy number of features that IDA does, but at least it has undo! It also has some great patching options. You can right click any instruction and modify it, or replace it. But if you want to do something more significant, you're only option out of the box is to overwrite the existing code. This didn't fit my use case though; I wanted to be able to insert non trivial chunks of code into a binary without overwriting code, and be able to run the resulting executable.
So I decided to write a hooking plugin for Binary Ninja.
Aside: Hooking vs Patching?
I don't really know the difference to be honest. I'm calling what I'm doing here hooking because I based it off the concepts I learned from Grey Hat Python, which were referred to as such; however, because we are modifying a static binary, some may prefer to call this "patching". Perhaps that is more accurate in this scenario, but I'm sticking with "hooking" for this blog post, because the code I wrote uses that term, and I've already written most of this post with that term. :)
Creating a plugin
Plugins for Binary Ninja are written in python and not to complicated to start. Vector35 has a nice sample plugin that you can start from, and a repository of community plugins that you can look at for inspiration. The API is fairly well documented, even if the correct way to do something isn't obvious just from looking through the documentation. Built in to the API are functions to create GUI input popups, compile assembly, and read and write parts of the binary (among many other things). Using these, my plugin only had one interesting problem to solve:
Where can we put the new code inside the existing executable?
I believe the technical term for what I was looking for is a "code cave". Empty space and dead code sections are popular choices for code caves, but they are often found manually on a case by case basis. My task was to find a consistent area of space inside any executable to use as a code cave.
My first idea was to simply append another code segment at the end of the file. I didn't take this route, though, because there wasn't an easy way to extend the size of the file through the plugin api, and it would involve significant modification of the ELF executable header (I decided to focus on ELF executables because I understand their organization better than other types). After realizing adding a segment would be too much effort, I spent a lot of time just looking at several executables in Binary Ninja, searching for unused space within the binaries. Doing so, I found that each of the files I analyzed had a nontrivial amount of extra space between the code and data segments. This space was filled with zeros and not referenced anywhere. I couldn't find a definitive reason for this extra space online, but its presence was consistent enough in my (admittedly small) sample size that I accepted it as normal.
With the big question answered, the rest was standard python development. A sizable portion of the code was even able to be written without relying on the binary being of a specific architecture or format, thanks to Binary Ninja's abstractions. The only outside dependency I had to pull in was a pip package called filebytes. Binary Ninja didn't provide nice mechanisms for editing the ELF header, so I used this package to do so.
Let's use it!
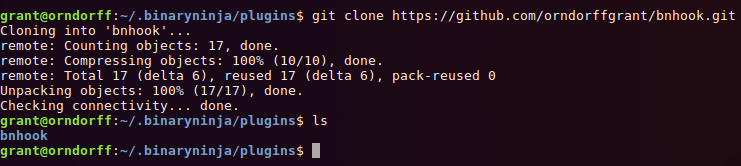
Installing any plugin is easy; just clone the repository into the plugins directory of Binary Ninja.
To show off the plugin I'm going to use a simple mystery program with a recursive function that we'll reverse with the help of a hook.
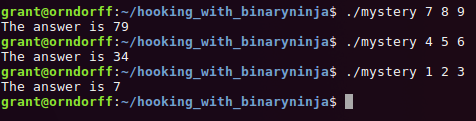
As you can see, the program takes in three number arguments and gives us the "answer," but we have no clue
how it calculates the answer. Below is the main function as shown in Binary Ninja.

First of all, this is way nicer to look at compared to IDA Pro. I don't have a copy of IDA so I can't show a side-by-side screenshot comparison, but Binary Ninja has a much more pleasant design and color palette IMHO.
Anyway, looking at main, we see that it just calls the mystery function with our three arguments after
converting them to integers. Before we look closer at the mystery function, let's do a simple example of a
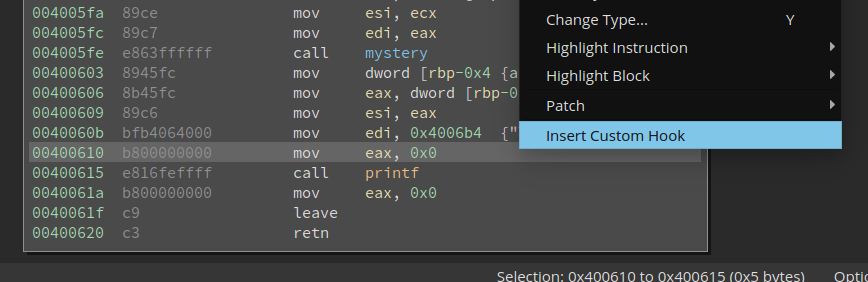
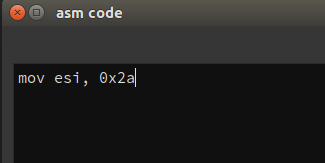
small hook to show how the plugin works. We're going to insert a one line hook right above the highlighted
instruction to modify the argument to printf.
First right click and click Insert Custom Hook.
We'll name this hook "test" and use a text box to type in our code.
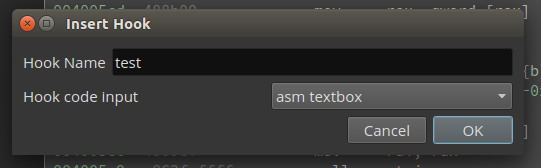
And our hook will just replace the value in esi, which is the number being printed.
Upon insertion, we see that the plugin has inserted some jmp statements to get to our new code and back.
It has changed the ELF header to include a larger code segment size, so that our new code can be located at the
end of the extended code segment. The bottom of main now looks like this in Binary Ninja:
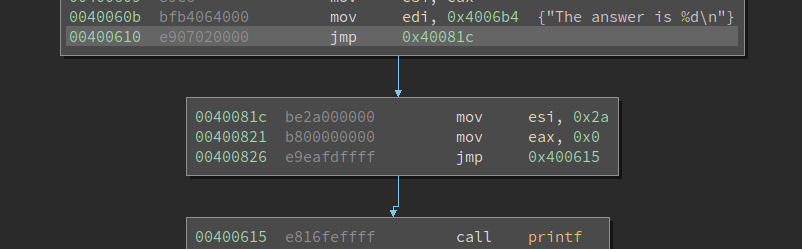
If we Save Contents As and run it we get exactly what we'd expect: the same number is printed out every
time!
Now for a real hook
We want to figure out what the mystery function does, but after a brief glance at the function in Binary
Ninja we can see that it is recursive. We're smart (read: lazy and don't want to think about recursion) so we
want an easier way than deciphering the assembly one instruction at a time. This is where the plugin comes in.
We'll use a hook to print out the arguments every time the function is called, and hopefully we'll glean some
information about its functionality
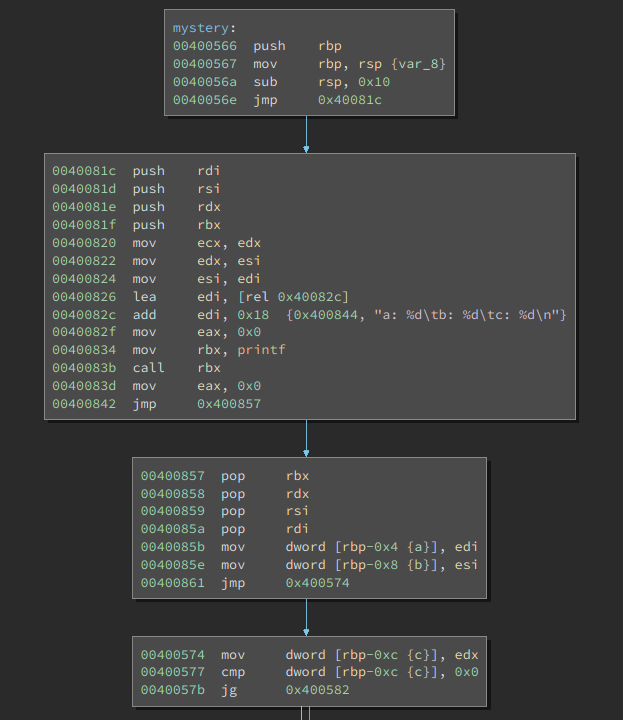
Here is the function in Binary Ninja before we add our hook.
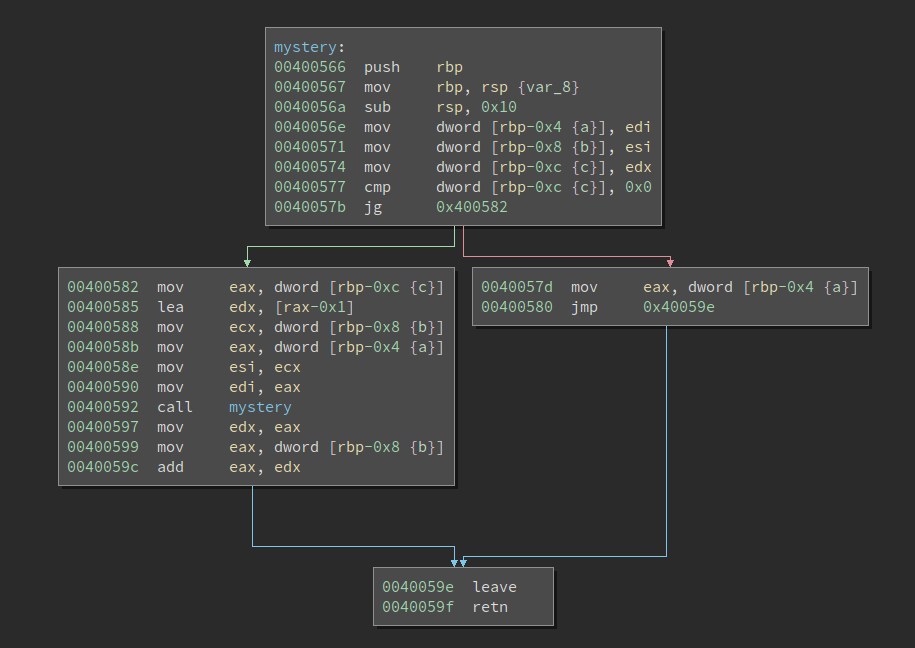
Ok, not too complicated, but humor me so I can demonstrate the plugin :)
Our hook needs to do a couple of things. It needs to access the arguments of the mystery function, pass them
to a print function, and restore the state of all the registers it uses, so that the function will work
properly after our hook. In order to use printf, we also need a format string, which we can include directly
in our code. Below is the assembly for printing out the three arguments.
push rdi
push rsi
push rdx
push rbx

mov ecx, edx
mov edx, esi
mov esi, edi
lea edi, [rip]
format_string_ref: add edi, format_string-format_string_ref
mov eax, 0
mov rbx, 0x400430
call rbx
mov eax, 0
jmp cleanup

format_string: db "a: %d",9,"b: %d",9,"c: %d",10,0

cleanup:
pop rbx
pop rdx
pop rsi
pop rdi
Notice that we first push a bunch of registers onto the stack to save their state, which we restore at the
end. We also insert the format string directly into the code, and do some pointer arithmetic with the value
of rip to get the pointer to the string. Finally, we call printf by putting the function address in a
register and calling it, because a relative call would require extra pointer calculations.
Now where do we insert it? We have two primary constraints here: we need access to the arguments, and we can't
insert it such that a relative instruction (such as a jmp) is overwritten. The plugin isn't smart enough to
fix offsets in relative jmps that it moves around to make room for our hook, so we have to avoid it. With
these constraints in mind, I chose to insert the hook after the sub rsp, 0x10 line. Here's the beginning of
the mystery function after we insert.
Note the jmp over bytes 0x400844 through 0x400856; that's where our format string is located. Now we
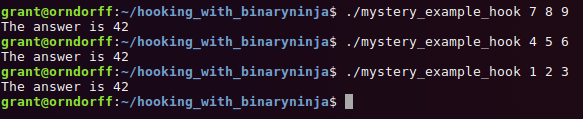
can save our patched version of the executable and run it!
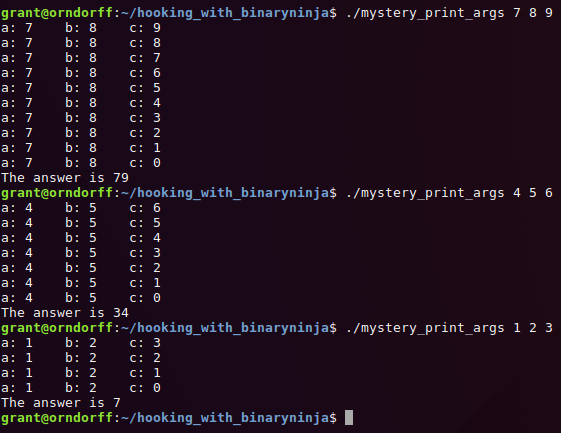
Just from this output we can tell that the third argument decides the number of times that mystery will
recurse, and that the other two arguments never change. It's not totally clear how we get to the final answer
though. To gain more insight I added another hook to print out the result of the mystery function, using
all of the same techniques used for the first hook.
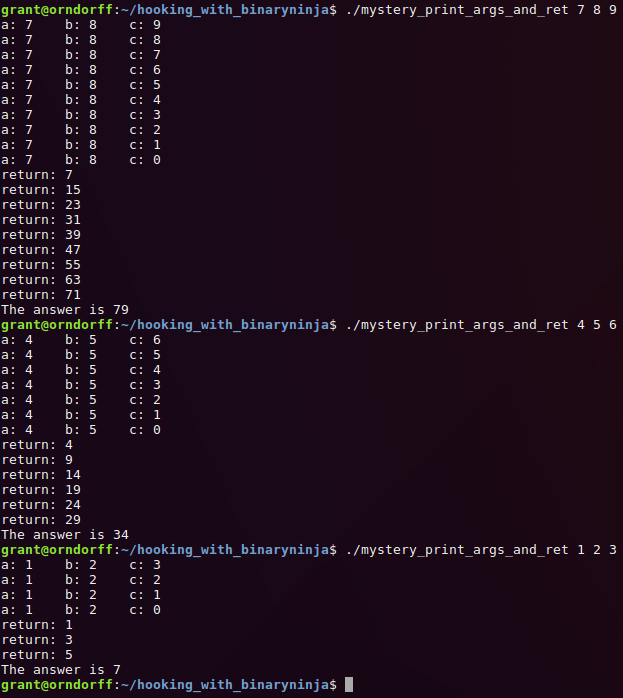
Now the functionality is clear! The base case of the recursive function returns the value of the first argument, and every other recursive call adds the value of the second argument to the result. We probably could've figured that out just looking at the disassembly, but that's tedious, less fun, and doesn't demonstrate a use for hooks!
The nice part about using this plugin for Binary Ninja is that when you insert a hook, it appears in the disassembly graph so you can see how it interacts with the rest of the executable. Also, you can undo if you don't like it, and the hook goes away! The ability to see the hook inserted and undo if I made a mistake made testing the hooks for this blog post painless.
What next?
The plugin is open source and hosted on github. It currently supports x86 and x86_64 ELF executables but shouldn't be too hard to extend to support other architectures and file formats. If there is interest, I may take the time to do so, and I will also accept reasonable pull requests. I would also like to implement functionality for listing and keeping track of all inserted hooks as well as deleting specific ones when I have time!
Is this plugin useful? Useless? Did my write up make sense? Let me know!