Reverse engineering practice
This spring semester will be the first that I will be a teaching assistant for a class at the University of Maryland. I'm TAing a class called Introduction to Reverse Engineering that I took in fall 2014. Since it's been a little while since I took the class myself, I figured I should refresh on my basic reversing skill. After googling for reverse engineering exercises I came across a github repository by user wapiflapi that had some small password checking binaries compiled for 64 bit linux and intended to be puzzles for the aspiring reverse engineer. In this post I'll walk through how I solved some of them. If you want to follow very closely, you'll have to actually get the binaries, as I only put pictures of the more important pieces.
Before I could start, I had to figure out what tools I was going to use to tackle these problems. IDA Pro is the industry standard for reversing, but it's outside of my price range, and the free version doesn't disassemble 64 bit binaries. I looked at some alternatives, including Hopper, which is a much less expensive tool, but ended up going completely open source with radare2. Radare is a binary analysis tool used from the command line. It has a couple graphical front ends, but I found them to be pretty buggy. The text version was the most complete and sufficiently intuitive for picking up as I went along. Most of the screenshots below are of radare's text interface, with some comments and changed variable names added by me.
I tried to restrict myself to static binary analysis for these exercises, though a couple could be done much faster if coupled with dynamic debugging using gdb. I've noted a particularly good example below where this is the case. The reason I did this, is because I wanted to practice reading assembly and translating it into a higher level language, rather than just figuring out where to set a breakpoint and printing a specific register.
Wapiflapi's exercises do a pretty good job of starting easy and getting harder as you progress, so below I cover how I solved exercises one through five out of ten. This spans a simple string literal comparison all the way to a fairly complex string transformation. I don't claim to be an expert in this realm, but I do find the art of reversing interesting and figured this would be a good adventure to feature as my first post with real content. I hope to do the rest of the exercises as well when I get the chance!
Exercise 1
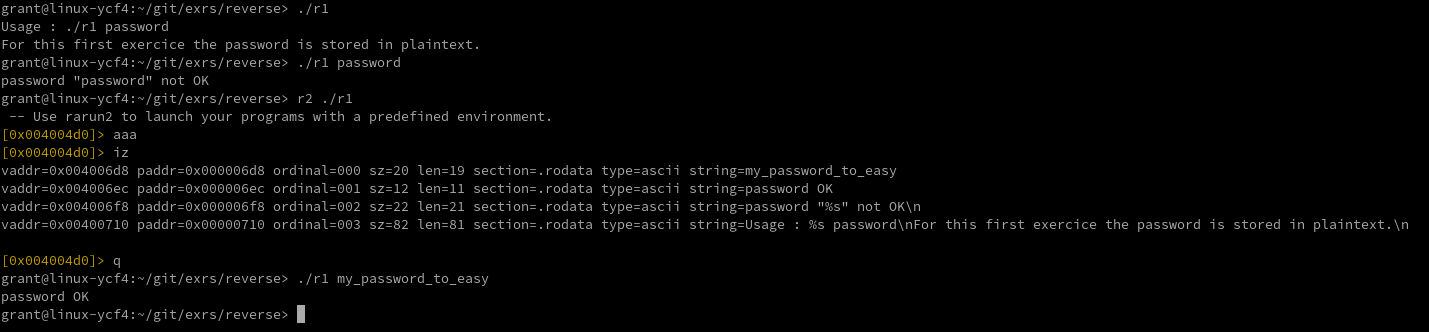
wapiflapi was kind enough to give hints when you run the program without a password guess. The hint for exercise one was that the password was in plain text. After listing all the strings in the binary it was pretty apparent which one was the correct password. See the image below for all the commands needed to solve this one.
Exercise 2
Moving right along, if we look at the main function of exercise 2 we can see it calls a function called
compare_pwd which does most of the work. This structure is mirrored in most of these exercises. In the
compare_pwd function below we can see that our input is compared using strcmp to a string returned from
a function called get_pwd. A constant number is passed into get_pwd as an argument. That constant is
0x495d7b495c303234565c3032377b57414751565c3032377b545340.

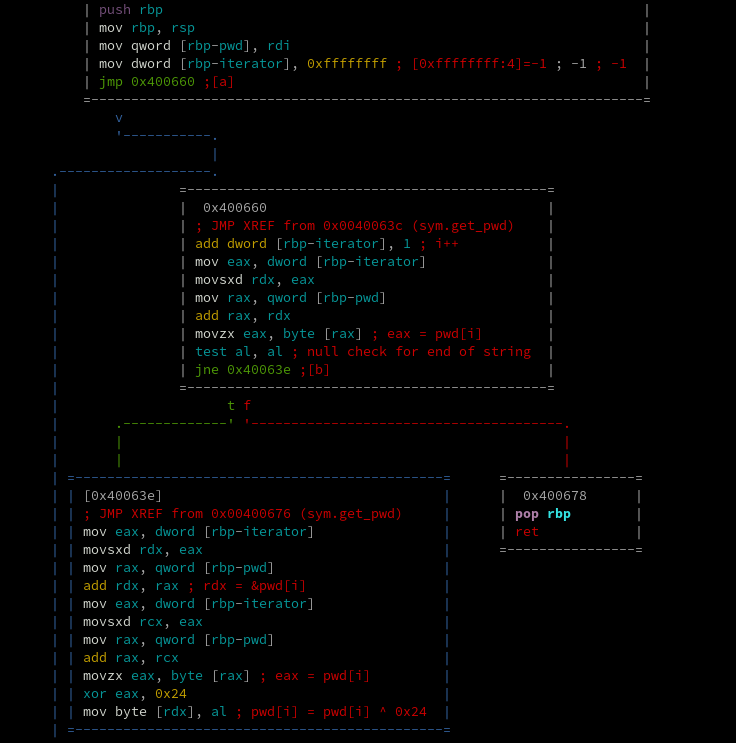
Now let's look at the get_pwd function. The important part, seen below, iterates over each byte of the number
passed into it and xors it with 0x24. The resulting string of bytes is then returned.
If we do that ourselves, we see that the above string of bytes xor with 0x24 turns out to be
"my_m0r3_secur3_pwd."
Sure enough, this is the correct password.
Exercise 3
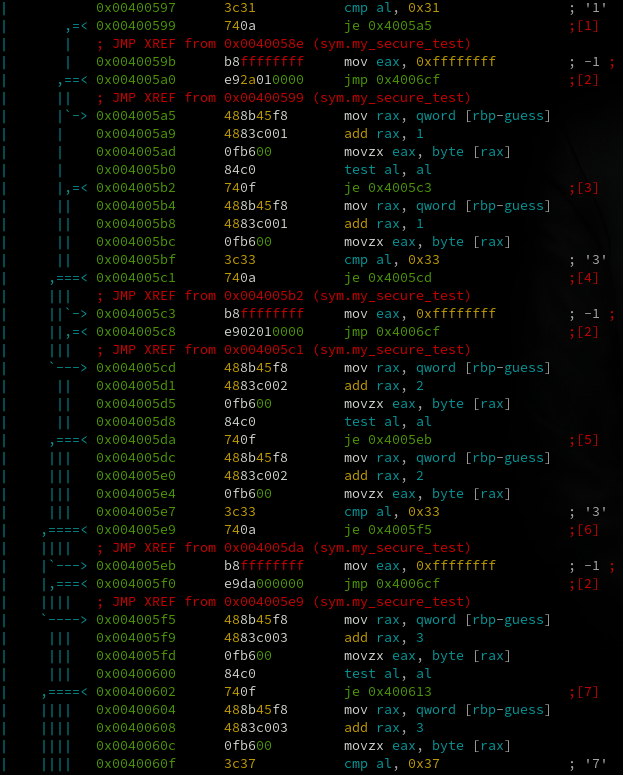
Inside the compare_pwd function of this exercise, the pointer to our input is passed to another function
called my_secure_test. This one was funny. This function goes through each byte of the input and compares
it to a different hard coded character value. If you look down the side of this screenshot you'll see the
characters 1,3,3, and 7 next to cmp instructions for sequential parts of the input. This continues to spell
out 1337_pwd.
Exercise 4
This one took longer than I would care to admit, mostly because I kept treating pointers as data and getting confused when the result wasn't ASCII. Here, we'll pretend I did everything on the first try though.
The hint for this one says "Back to plaintext, ex03 didnt fix anything anyway." but if we print out the all the strings in the binary we'll see that there are several hundred string literals present. From here we can only guess that the correct password is hidden somewhere in the middle of all of them. We could probably brute force by just trying all of them, but that would be really boring so instead let's keep staring at assembly.
In the beginning of the main method we see a large memcpy call to move a lot of data into a local array.
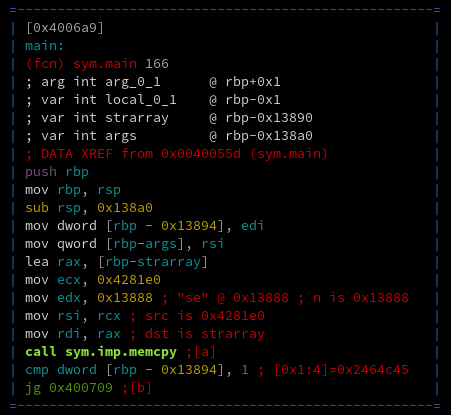
When we look at the beginning of the data being copied into the array (starting at 0x004281e0) we see it
is structured in 8 byte groups, the values of which increase slowly.
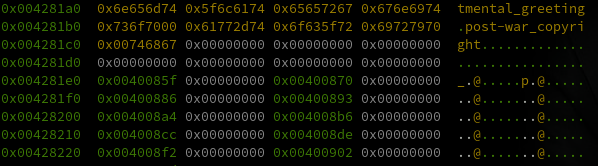
(This is the data that I took way too long to realize was actually a huge list of pointers. What threw me off was that the view I was originally using in radare split the data into individual bytes in little endian order, rather than groups of 4 bytes as shown above).
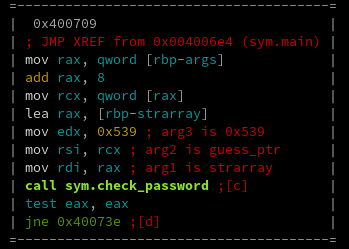
After this large memcpy, three arguments are passed into the compare_pwd function: the pointer to our inpu
, the pointer to the large array of pointers that was just copied, and a constant number 0x539 (which equals
1337 in decimal, of course).
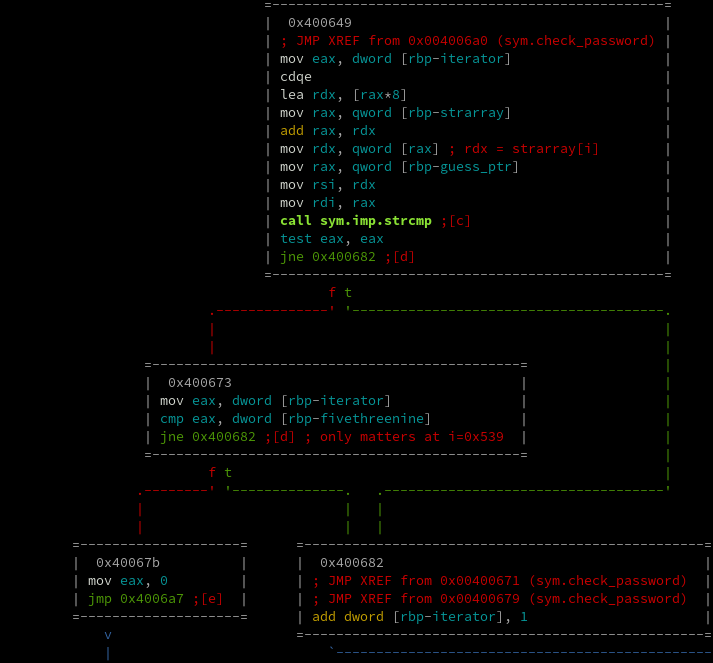
Now let's look at compare_pwd. This function iterates through the list of pointers and passes each of them
into strcmp along with the pointer to our input. This is when it becomes completely clear that each pointer
in the array points to one of the many string literals present in the binary. The function returns true if
our input matches the 0x539th string in the array.
Alright, now we just find the 0x539th pointer in this list and see which of the many string literals it points to.
The array starts at 0x4281e0.
0x4281e0 + (0x539 * 8) = 0x42aba8
Here we see the pointer value at 0x42aba8 is 0x405cb2.

And the string at 0x405cb2 is...

single_brandy!
Exercise 5
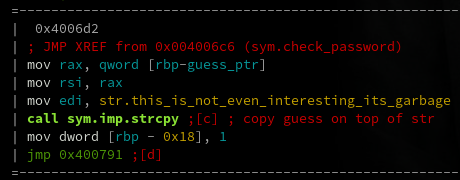
Exercise 5 is the last one for this walk through, and the first to perform a non trivial transform rather than simple obfuscation. The first thing the binary checks is the length. It fails automatically if the input length is not equal to 40. After that, the first interesting thing it does is copy our guess over top of a local string variable, as seen below. If you didn't notice this, then most of the processing would look pointless as it is all operating on this local variable.
After this copy, a lot of operations are done on the string in a nested loop, until finally the end result
is compared to "this_aint_that_simple_but_good_luck."

Encouraging. Thanks wapiflapi.
At this point we know that our input gets processed and that the end result of that process must equal this special string, so let's look at the assembly for the processing.
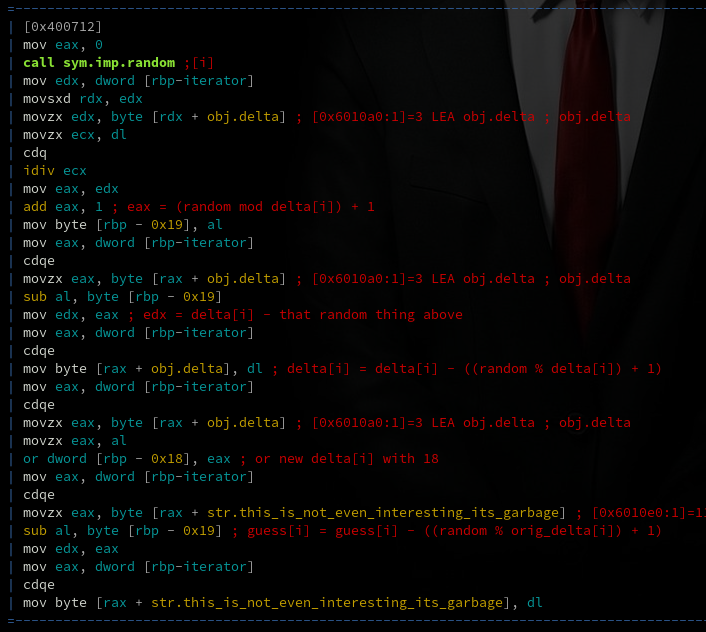
Above is the primary chunk of the transformation. But wait. What's that? A random call?! How can there be
a right answer if the transformation relies on random?
That tricked me for a while, until I remembered that by default, the random function in C always uses the
same seed, and this binary never called srandom. So after understanding everything else that was going
on, I decided the best way to continue was to rewrite the entire transformation in C so that the same random
numbers are used.
Here's my code that outputs the answer. The transformation itself is rewritten inside the while loop.
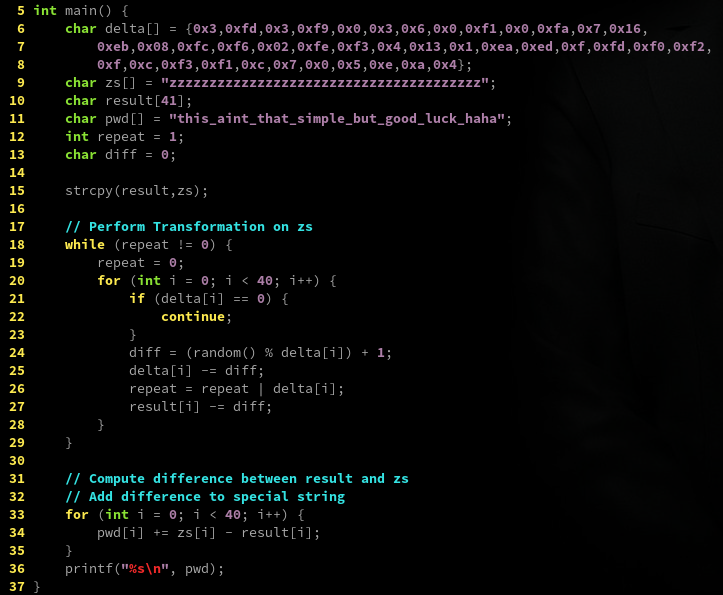
delta is an array of bytes that the transformation relies on, so I just looked up the hex values in radare
and copied them over. The end result is essentially that a hard to predict number is subtracted from each
character in the string. My solution to reverse it was to simply perform this transformation on a string full
of the character 'z', note the end differences, and then add it back onto the special string:
"this_aint_that_simple_but_good_luck."
Running this code outputs the correct password: "well_done_now_go_on_irc_and_ask_for_more."
Now I mentioned at the beginning that some of these could be done easily using gdb rather than static analysis.
Exercise 5 is the best example, because we can do everything my custom code did by just running the exercise
with the 'z' input, setting a breakpoint at the right time, and outputting the contents of a certain register.

This sequence of bytes is the value difference between "this_aint_that_simple_but_good_luck" and "well_done_now_go_on_irc_and_ask_for_more."
Outcome
Doing these exercises was a great way to refresh on these skills before TAing a basic course on reversing. By the time I got to exercise 5 I found myself challenged but not overwhelmed. Hopefully, over the course of the semester, I'll only get better at reversing and be able to do more realistic tasks. But for now, it's just fun practice.
Please leave your thoughts on the exercises, my methodology, the tools, or anything else you think is relevant in the comments section below.
Thanks!